Transform your backyard into a cozy and smoke-free oasis with a DIY smokeless fire pit. Whether you’re hosting outdoor gatherings or simply enjoying a quiet night under the stars, a smokeless fire pit creates a serene ambiance without the annoyance of smoke lingering in the air. With just a few supplies and some basic tools, you can easily construct your own smokeless fire pit and start enjoying the warmth and beauty of a fire without the hassle.
- Save money by building your own smokeless fire pit.
- Create a smoke-free environment for outdoor gatherings.
- Repurpose materials for a unique and eco-friendly project.
- Enhance your backyard with a personalized touch.
- Enjoy the warmth and ambiance of a fire without the hassle of smoke.
How a Smokeless Fire Pit Works
A smokeless fire pit is a revolutionary design that utilizes a sophisticated combustion system to significantly reduce smoke and create a more enjoyable outdoor experience. Understanding the mechanism behind its operation can help you appreciate the ingenuity of smokeless fire pit design and construction.
Unlike traditional fire pits that produce copious amounts of smoke, a smokeless fire pit employs a clever technique called secondary combustion. This process involves drawing air from the bottom of the pit, which is then heated to extreme temperatures. As the superheated air rises, it is directed back into the fire pit through vent holes located around the lip.
The re-entry of the hot air creates powerful jets of flame that effectively burn the smoke before it has a chance to escape the fire pit. This innovative design ensures a virtually smokeless burn, allowing you to enjoy the warmth and ambiance of a fire without the discomfort and annoyance of smoke.
The secondary combustion system of a smokeless fire pit demonstrates the skillful integration of engineering principles and thoughtful design. By harnessing the power of airflow and heat, this advanced fire pit design provides a cleaner and more enjoyable fire experience.
Why is the Secondary Combustion System Effective?
The secondary combustion system effectively reduces smoke for several reasons:
- The influx of air from the bottom of the fire pit ensures a sufficient supply of oxygen, creating optimal combustion conditions.
- The intense heat generated during secondary combustion incinerates the volatile compounds present in the smoke, eliminating smoke production.
- The vent holes strategically positioned around the fire pit’s edge facilitate the re-entry of hot air, creating a continuous cycle that sustains the secondary combustion process.
The result is a smoke free fire pit that enhances your outdoor gatherings, providing a cleaner and more enjoyable atmosphere for you and your guests.
| Benefits of a Smokeless Fire Pit |
|---|
| Eliminates smoke and reduces respiratory discomfort. |
| Creates a more pleasant atmosphere for outdoor gatherings. |
| Enhances safety by preventing smoke-related accidents and potential fire hazards. |
| Allows for a more efficient and complete burn, reducing the amount of firewood needed. |
“The secondary combustion system of a smokeless fire pit is a true game-changer in outdoor fire design. Its ability to reduce smoke while providing a warm and inviting fire is a testament to the innovative thinking behind its construction.”
– Outdoor Living Magazine
Now that you understand how a smokeless fire pit works, let’s dive into the supplies and tools needed to construct your own DIY smokeless fire pit.
Supplies and Tools Needed
To build a smokeless fire pit, you will need the following supplies and tools:
- An old clothes dryer
- A propane tank
- Three bolts for the legs
- Material to make the legs
- A jigsaw
- A grinder
- A welder
- A drill
- A tape measure
- A marker pen
- Various drill bits
These supplies and tools are essential for constructing your DIY smokeless fire pit.
Now that you have your materials ready, let’s move on to the next section where we’ll discuss how to harvest the materials for your smokeless fire pit.

Using the right supplies and tools is crucial for building a successful smokeless fire pit. Make sure you have everything you need before starting your DIY project.
Harvesting the Materials
When it comes to building a smokeless fire pit, you don’t need to look far for the necessary materials. In fact, you may already have some of them lying around, waiting to be repurposed. By utilizing items you already have or can easily find, you can create a truly unique DIY smokeless fire pit. Let’s explore some smokeless fire pit ideas and the materials needed to bring them to life.
Recycling Old Appliances
If you have an old clothes dryer that’s no longer functional, don’t rush to dispose of it. Instead, consider repurposing the drum for your smokeless fire pit. The cylindrical shape of the drum makes it an ideal container for holding the firewood, while the ventilation holes allow for proper airflow. This not only saves you money but also adds character to your DIY project.
Transforming a Propane Tank
Another key component of your smokeless fire pit is the base, and a propane tank can serve this purpose perfectly. Simply clean the tank thoroughly and remove any remaining gas or residue. With the valve removed, the tank becomes an excellent foundation for your smokeless fire pit. Its sturdy structure ensures stability while the size provides ample space for the fire. Be sure to exercise caution when handling propane tanks and follow proper safety measures.
Other Convenient Materials
In addition to repurposing old appliances, you may need to gather a few additional materials. These might include bolts for attaching the legs, metal or wood for constructing the legs, and heat-resistant paint for protecting your smokeless fire pit from the elements. Let your creativity flow as you explore various smokeless fire pit ideas and choose materials that suit your style and preferences.
Safety Precautions
When embarking on the construction of your smokeless fire pit, it is crucial to prioritize safety. Working with a propane tank and cutting into it requires caution and appropriate safety measures. By following these essential safety guidelines, you can ensure a secure and rewarding DIY experience.
Working Environment and Ventilation
First and foremost, always work outdoors or in a well-ventilated area when handling propane tanks or engaging in any activities involving cutting or welding. Adequate ventilation is essential to dissipate propane fumes and prevent potential health risks.
Note: Propane is odorless and colorless, but an additive called mercaptan is used to create a distinct smell, similar to rotten eggs, to aid in the detection of leaks.
Protective Gear
Protecting yourself with appropriate gear is paramount during the construction process. Wear the following safety equipment:
- Safety glasses or goggles to shield your eyes from sparks and debris;
- Heavy-duty gloves to protect your hands from sharp edges and burns;
- A long-sleeved shirt and pants to safeguard your skin;
- A respiratory mask or face shield to minimize inhalation of fumes;
- Sturdy footwear to prevent injuries.
Propane Tank Precautions
Prior to cutting into the propane tank, ensure it is completely purged of any residual gas. Emptying the tank can be accomplished by removing the main valve or using a professional gas service. Taking this precaution will minimize the risk of explosions or accidents during the construction process.
Fire Safety
During your DIY smokeless fire pit construction, it is crucial to have fire safety precautions in place. Keep a fire extinguisher or a bucket of sand nearby to address any potential fire hazards. You should also have a plan for extinguishing the flames in case of an emergency.
Remember, safety should always be a priority when undertaking any DIY project. By following these precautions, you can enjoy a smooth and secure smokeless fire pit construction process.

Cutting and Marking the Drum
When constructing your DIY smokeless fire pit, cutting and marking the drum is a crucial step. This process involves using a jigsaw to create an opening in the propane tank that will serve as the drum for your fire pit. Pay attention to the following steps to ensure accurate cutting and proper fit:
- Mark the line: Begin by marking the line on the tank where you want to cut. Use a marker pen and a tape measure to ensure precision. Take the time to measure and mark the line accurately before proceeding with the cut.
- Choose the right blade: Select a jigsaw blade suitable for cutting through metal. A bi-metal or carbide-tipped blade is recommended for this purpose.
- Cut along the marked line: With your jigsaw fitted with the appropriate blade, carefully cut along the marked line. Take your time and follow the line closely to achieve a clean and accurate cut.
- Adjust for imperfections: It’s important to note that propane tanks may have slight imperfections in their roundness. If your drum does not fit perfectly against the tank due to these imperfections, make necessary adjustments to ensure a proper fit. This may involve trimming or sanding specific areas as needed.
Remember to prioritize safety during the cutting process. Wear protective gloves, goggles, and work in a well-ventilated area. Follow proper safety guidelines to minimize the risk of injury.
| Step | Instructions |
|---|---|
| 1 | Mark the line |
| 2 | Choose the right blade |
| 3 | Cut along the marked line |
| 4 | Adjust for imperfections |
Drilling Vent Holes
Proper airflow is essential for creating a smokeless fire pit. To achieve this, you’ll need to drill vent holes along the top of the fire pit insert. These holes allow for the smooth circulation of air, promoting efficient combustion and reducing smoke.
Start by marking the positions of the vent holes evenly around the perimeter of the fire pit insert. Use a marker pen and a tape measure to ensure accuracy. You can create a visually pleasing pattern or simply space the holes evenly.
Next, choose the appropriate drill bit for your fire pit materials. Different materials may require different types of drill bits, so be sure to select the one that suits your smokeless fire pit construction. For example, if you’re working with a metal fire pit insert, a high-speed steel bit should work well.
Once you have the right drill bit, carefully drill holes at each marked position. Take your time to ensure clean and precise cuts. You can use a drill press or a handheld drill, depending on your available tools and personal preference.
After drilling the initial holes, you may need to enlarge them to ensure adequate ventilation. A step drill bit can be handy for this task. Gradually enlarge the holes by stepping up the bit size until you achieve the desired diameter. This larger hole size allows for improved airflow and better smoke reduction.
Remember, the number and size of vent holes may vary depending on the size and design of your smokeless fire pit. It’s essential to strike the right balance between efficient airflow and structural integrity to ensure a successful build.
Welding and Assembly
Now that you have prepared the materials for your smokeless fire pit, it’s time to weld them together and assemble the legs. This step is crucial in ensuring the stability and functionality of your DIY creation.
Tip: Prior to welding, it is important to remove the galvanizing and powder coating from the tank and drum. This can be done using a wire brush or chemical stripper, ensuring a clean and seamless weld.
When welding, take your time and be mindful of the process. Avoid rushing or making rookie mistakes that can compromise the structural integrity of the fire pit. It’s essential to achieve strong and secure welds to ensure the safety of your smokeless fire pit.
Next, assemble the legs using rivnuts and button head bolts. This allows for easy removal and transportation of the fire pit, making it a convenient option for camping trips or backyard gatherings.
Welding and Assembly Summary
By carefully welding the tank and drum together and assembling the legs using rivnuts and bolts, you will create a sturdy and portable smokeless fire pit. The welding process helps ensure a secure connection, while the removable legs provide flexibility and convenience.
| Steps | Instructions |
|---|---|
| 1 | Remove galvanizing and powder coating from the tank and drum. |
| 2 | Weld the tank and drum together, ensuring strong and secure welds. |
| 3 | Assemble the legs using rivnuts and button head bolts. |
Once you have completed the welding and assembly process, your smokeless fire pit will be ready for the next steps, including painting and finishing.

Painting and Finishing
Adding the final touches to your DIY smokeless fire pit is an exciting step in the construction process. By applying a heat-resistant paint, you can enhance the durability and aesthetics of your fire pit while protecting the metal from the effects of heat and weathering. Consider the following tips for a flawless finish:
Choosing the Right Paint
When selecting a paint for your smokeless fire pit, opt for a heat-resistant formula that can withstand high temperatures. Look for paints specifically designed for use on metal surfaces, as they provide excellent adhesion and resistance to cracking or peeling.
Color Selection
The color you choose for your fire pit can contribute to the overall design and ambiance of your outdoor space. Consider hues that complement your backyard decor, such as earthy tones for a natural look or bold colors for a modern aesthetic. The paint color should harmonize with the surrounding area and create a visually appealing focal point.
Application Process
Before applying the paint, ensure that the fire pit surface is clean and free from dirt, grease, and rust. Use a wire brush or sandpaper to remove any loose particles. Follow the instructions provided by the paint manufacturer for the best application technique and drying time. Apply multiple thin coats, allowing each coat to dry completely before adding the next layer.
Remember to work in a well-ventilated area and wear protective gloves and a mask to avoid inhalation of paint fumes. Allow the paint to cure fully according to the manufacturer’s recommendations before using your smokeless fire pit.
With a fresh coat of paint, your DIY smokeless fire pit will look stunning and be ready to enhance your outdoor gatherings for years to come.
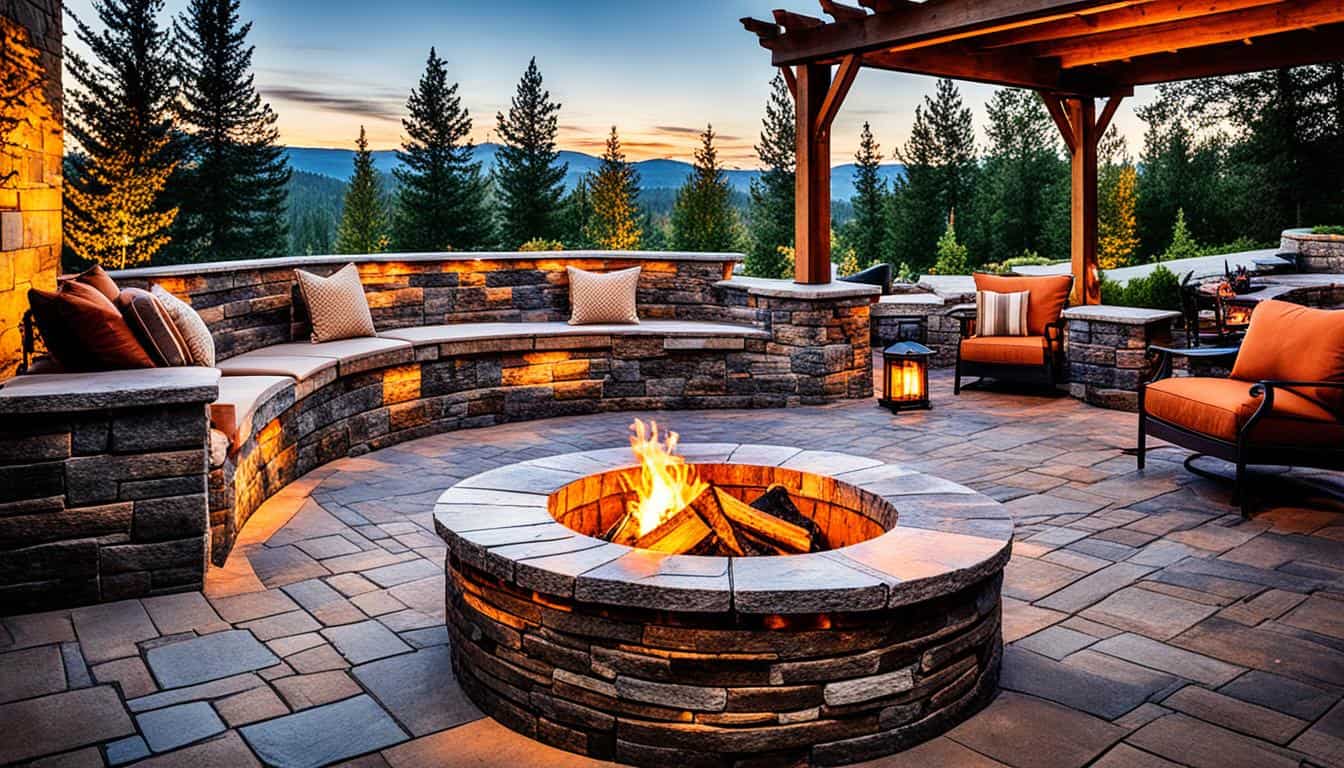
Building the Fire Pit Structure
To create a sturdy and functional smokeless fire pit, you’ll need to construct a solid structure using masonry pavers for the outer wall and a metal fire pit ring for the inner wall. Follow these step-by-step instructions to ensure proper construction:
- Prepare the area: Clear the ground and lay a foundation of gravel or sand.
- Place the first layer of pavers: Arrange the masonry pavers in a circular shape, leaving space for the fire pit ring.
- Add landscape block adhesive: Apply landscape block adhesive between each layer of pavers to provide stability and prevent shifting.
- Add subsequent layers of pavers: Continue stacking the pavers, ensuring proper alignment and spacing.
- Insert the metal fire pit ring: Place the metal fire pit ring inside the circular opening, ensuring it sits securely on the pavers.
- Level the structure: Use a level to make sure the fire pit structure is even and stable.
You can create a visually appealing design by alternating different colors or sizes of masonry pavers. The structure will provide the necessary support for your smokeless fire pit, allowing you to enjoy its warmth and beauty during your outdoor fire pit projects.
For a visual reference, see the image below:
Testing and Using the Smokeless Fire Pit
Now that your smokeless fire pit is fully assembled, it’s time to put it to the test. Follow these steps to ensure a successful burn and enjoy the warmth and ambiance of your DIY creation:
- Light a Fire: Use newspaper or fire starters to ignite the firewood or charcoal in your smokeless fire pit. Be cautious and follow proper safety protocols.
- Initial Smoke: You may notice some smoke during the first few minutes of burning. This is normal as the fire pit reaches its optimal temperature and the secondary combustion process begins.
- Smoke Dissipation: As the jets of fire burn the smoke created by the initial burn, you’ll see a noticeable reduction in smoke. The smokeless design of your fire pit ensures a more enjoyable outdoor experience.
“The smokeless fire pit not only adds warmth and ambiance to your outdoor gatherings, but it also eliminates the nuisance of smoke, allowing you and your guests to fully appreciate the flames.” – Outdoor Living Magazine
Whether you’re hosting a cookout, enjoying a quiet evening under the stars, or simply roasting marshmallows with your family, your smokeless fire pit will create the perfect atmosphere. So gather your loved ones, grab some s’mores ingredients, and bask in the cozy glow of your DIY masterpiece.
Benefits of a Smokeless Fire Pit
A smokeless fire pit offers numerous benefits that enhance your outdoor experience. By investing in a smokeless fire pit, you can enjoy the warmth and beauty of a fire without the hassle or smell of smoke. Here are some of the key advantages:
1. Smoke Reduction
One of the main benefits of a smokeless fire pit is the significant reduction in smoke. Traditional fire pits can often produce a large amount of smoke, making it uncomfortable for you and your guests. By incorporating innovative design features, such as a secondary combustion system, smokeless fire pits effectively burn the smoke before it can escape, resulting in a virtually smoke-free burn. This means you can enjoy the fire without having to constantly reposition yourself due to smoke blowing in your direction.
2. Enhanced Outdoor Experience
With a smokeless fire pit, you can create a more enjoyable outdoor ambiance for gatherings and relaxation. The absence of smoke allows you to fully appreciate the warmth and mesmerizing flames without any distractions. Whether you’re hosting a cozy bonfire night or enjoying a quiet evening under the stars, a smokeless fire pit adds a touch of sophistication to your outdoor space.
3. Clean and Environmentally Friendly
Smokeless fire pits offer a cleaner and more environmentally friendly alternative to traditional wood-burning fire pits. The efficient burning mechanism reduces air pollution by minimizing the release of harmful particles and pollutants into the atmosphere. This not only helps to maintain the air quality in your backyard but also contributes to the overall health of the environment.
4. Versatility and Convenience
Smokeless fire pits come in various sizes, designs, and materials, providing you with a range of options to choose from based on your preferences and space requirements. Additionally, many smokeless fire pits are portable and easy to assemble, allowing you to enjoy a smoke-free fire wherever you go. Whether you want to set up a fire pit in your backyard, take it on a camping trip, or bring it to a friend’s outdoor gathering, the versatility and convenience of smokeless fire pits make them an excellent choice.
Overall, a smokeless fire pit combines functionality, aesthetics, and environmental consciousness, giving you a superior fire experience that is both enjoyable and sustainable. The DIY aspect of building your own smokeless fire pit adds a personal touch to your outdoor project, allowing you to showcase your creativity while enjoying the benefits of a smoke-free fire.
Conclusion
Building a homemade smokeless fire pit is a fulfilling and practical project that can greatly enhance your outdoor space. By repurposing materials and following a step-by-step process, you can create a one-of-a-kind fire pit that not only adds warmth and ambiance but also reduces smoke. This DIY endeavor allows you to customize your design to match your backyard aesthetic and enjoy cozy nights and memorable gatherings all year round.
With the right supplies and tools, such as an old clothes dryer, propane tank, jigsaw, welder, and drill, you can bring your homemade smokeless fire pit to life. By drilling vent holes, welding the tank and drum, and assembling the structure with masonry pavers and a metal fire pit ring, you’ll create a durable and efficient fire pit that minimizes smoke and maximizes enjoyment.
Imagine relaxing with family and friends around your very own homemade smokeless fire pit, basking in the beautiful flames without the annoyance of smoke billowing in your face. The satisfaction of completing this DIY project will be matched only by the countless evenings spent in the cozy glow of your creation. So why wait? Dive into the world of DIY and bring the warmth and charm of a smokeless fire pit to your outdoor living space today!
FAQ
How does a smokeless fire pit work?
A smokeless fire pit uses a secondary combustion system to reduce smoke. It draws air from the bottom of the pit, which gets super hot, rises, and is then sent back through vent holes around the lip of the fire pit. This creates jets of fire that burn the smoke before it can leave the pit, resulting in a practically smokeless burn.
What supplies and tools do I need to build a smokeless fire pit?
To build a smokeless fire pit, you will need supplies such as an old clothes dryer, a propane tank, three bolts for the legs, and material to make the legs. You will also need tools like a jigsaw, grinder, welder, drill, tape measure, marker pen, and various drill bits.
How can I harvest materials for my smokeless fire pit?
The materials for your smokeless fire pit can be sourced from items you may already have or can easily find. For example, an old clothes dryer can be repurposed for the fire pit, while a propane tank can be utilized as the base. This recycling of materials adds a unique touch to your DIY project.
What safety precautions should I take while building a smokeless fire pit?
It is important to exercise caution when working with a propane tank and cutting into it. Use appropriate safety measures and work outdoors to avoid any potential risks. Additionally, be aware of the strong smell associated with propane and take necessary precautions to protect yourself.
How do I cut and mark the drum for the smokeless fire pit?
Use a jigsaw to cut the propane tank and create an opening for the drum. Take precautions to mark the line accurately and cut along it. Be mindful of any imperfections in the tank’s roundness and make necessary adjustments to ensure a proper fit between the tank and drum.
How do I drill vent holes for the smokeless fire pit?
Drill vent holes along the top of the fire pit insert to allow for proper airflow. These holes should be marked evenly and drilled with appropriate drill bits. Enlarge the holes with a step drill to ensure adequate ventilation for the smokeless fire pit.
How do I weld and assemble the smokeless fire pit?
Weld the tank and drum together, ensuring proper preparation by removing galvanizing and powder coating. Take care to weld carefully to avoid any rookie mistakes. Assemble the legs using rivnuts and button head bolts, allowing for easy removal and transportation of the smokeless fire pit.
Should I paint and finish my smokeless fire pit?
Consider applying a heat-resistant paint to the fire pit for added durability and aesthetics. This can help protect the metal from heat and weathering. Choose a color that complements your backyard design and enhances the overall look of your DIY smokeless fire pit.
How do I build the structure for the smokeless fire pit?
Construct the structure of your smokeless fire pit using masonry pavers for the outer wall and a metal fire pit ring for the inner wall. Follow the step-by-step process, ensuring proper spacing and using landscape block adhesive for stability. The structure provides the necessary support for the smokeless fire pit.
How do I test and use my smokeless fire pit?
Once the smokeless fire pit is fully assembled, test it by lighting a fire. It may initially produce some smoke, but this will quickly dissipate as the secondary combustion process begins. Enjoy the ambiance and warmth of your DIY smokeless fire pit during outdoor gatherings and cookouts.
What are the benefits of a smokeless fire pit?
A smokeless fire pit offers numerous benefits, including a reduction in smoke and a more enjoyable outdoor experience. It allows you to enjoy the warmth and beauty of a fire without the hassle or smell of smoke. Additionally, the DIY aspect adds a personal touch to your backyard project.
How can building a smokeless fire pit enhance my outdoor space?
Building a DIY smokeless fire pit is a rewarding project that can enhance your outdoor space. By repurposing materials and following the step-by-step process, you can create a unique and functional smokeless fire pit. Enjoy the warmth and ambiance of your homemade creation during outdoor gatherings and cozy nights in your backyard.